Accessing Your R-DAS Allocation| Tip |
|---|
UA IP Address Required: To access your R-DAS allocation you need to be connected to either the UA campus network, or the UA SSL VPN. For information about connecting to a VPN, see VPN - Virtual Private Network. If you are accessing your R-DAS allocation from an HPC cluster, then you are already on the UA campus network and do not need to connect to the UA SSL VPN.
|
R-DAS can be accessed from Linux, MacOS, or Windows. The screenshots are intended to be visual aids, but they include information from the consulting team. When you proceed, please enter your own information.
| Deck |
|---|
| startHidden | false |
|---|
| id | Accessing your RDAS allocation |
|---|
|
| Card |
|---|
| default | true |
|---|
| label | Linux / HPC |
|---|
| title | Linux / HPC |
|---|
| Installing Necessary Packages| Warning |
|---|
Please do not run any sudo commands on the HPC clusters. These are meant only for your personal Linux machines. All required packages are already installed on the HPC clusters. |
To access your R-DAS allocation from a Linux distribution, you need the samba package. If you are using a GTK based desktop environment, such as MATE and GNOME, then you will also need the Samba backend for GVfs. If you want to access your R-DAS allocation from the command line, you will need the smbclient package. Select your Linux distribution from the list below to view installation instructions: | Expand |
|---|
| sudo apt install samba gvfs-backends smbclient
|
| Expand |
|---|
| sudo yum install samba gvfs-samba samba-client
|
| Expand |
|---|
| title | Other Linux distributions |
|---|
| Please check the documentation of your distribution. |
| Warning |
|---|
The smbclient package is not available on the HPC. Please use the GUI method to access your R-DAS allocation from the HPC clusters. |
For other Linux distributions, please check their respective documentation to learn how you can install these packages. | Deck |
|---|
|
| Card |
|---|
| default | true |
|---|
| label | GUI |
|---|
| title | GUI |
|---|
| On a desktop environment, such as MATE, GNOME, KDE, you can mount your R-DAS allocation as a local drive with the corresponding file manager (Caja on MATE, GNOME Files, Dolphin on KDE). | Expand |
|---|
| title | Desktop environment on HPC |
|---|
| Follow the steps in the Virtual Desktop guide to launch an Interactive Desktop. This will start a Linux environment with the MATE desktop environment in your browser. You can use and access the HPC resources from this desktop interface. |
On a desktop environment you can mount the R-DAS allocation with the following (the screenshots are from Caja on MATE, but the experience is similar across the other deskop environments): Open the file manager (Caja, GNOME Files, Dolphin). | Expand |
|---|
| On the HPC Interactive Desktop's MATE desktop environment, you can launch Caja by clicking the file drawer like icon in the top bar, or by selecting Applications > System Tools > Caja. 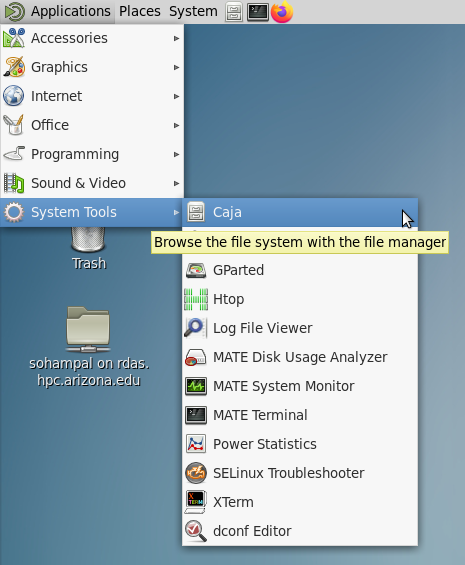
|
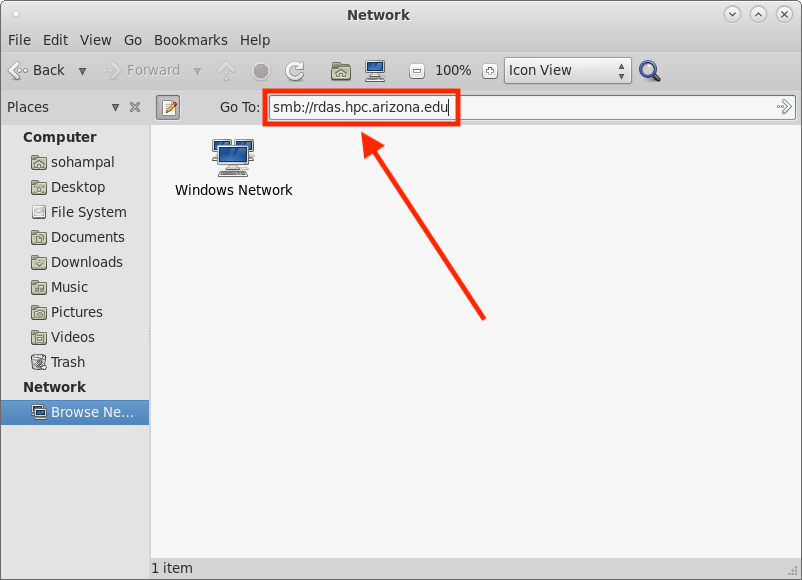
- Press
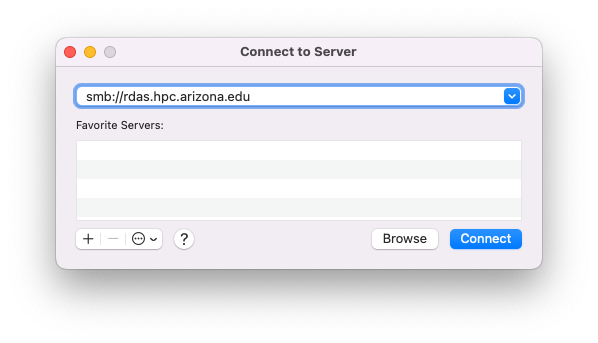
Ctrl + l. This makes the location bar editable. - Enter smb://rdas.hpc.arizona.edu in the location bar, and press
Enter.
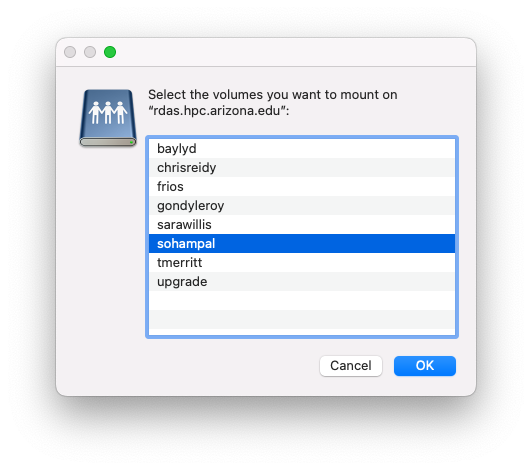
 A few moments later a window opens, prompting for your Username (BLUECAT\ followed by your UA NetID) and Password (UA NetID password). After entering the details, select Connect(on other file managers this maybe OK). Some file managers, such as Caja and GNOME Files, also have a Domain field, whereas others, like Dolphin, do not. Either way, you do not need to modify its default value. 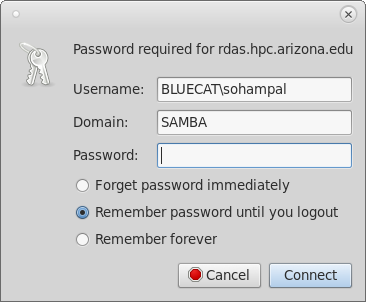 - Select the allocation named after your group from the list of allocations displayed.
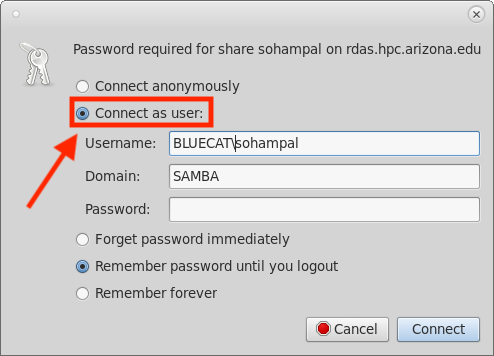
 - On some file managers, such as Dolphin, you can right away access your allocation by double clicking on it. On others, such as Caja and GNOME Files, double clicking on it will open another window prompting for your Username (
BLUECAT\ followed by your UA NetID) and Password (UA NetID password). Select Connect as user, enter the details, and select Connect. Your allocation will be mounted as a local drive.
|
| Card |
|---|
| You can interactively browse your R-DAS allocation with smbclient | Code Block |
|---|
| smbclient \\\\rdas.hpc.arizona.edu\\<share> -U BLUECAT\\<username> |
The <share> is the PI group that you belong to, and <username> is your UA NetID. The command will prompt for a password, enter your UA NetID password. This will start an smb shell. For example: | Code Block |
|---|
| language | bash |
|---|
| theme | Midnight |
|---|
| ~ $ smbclient \\\\rdas.hpc.arizona.edu\\sohampal -U BLUECAT\\sohampal
Password for [BLUECAT\sohampal]:
Try "help" to get a list of possible commands.
smb: \> |
Type help to get a list of possible commands: | Code Block |
|---|
| language | bash |
|---|
| theme | Midnight |
|---|
| smb: \> help
? allinfo altname archive backup
blocksize cancel case_sensitive cd chmod
chown close del deltree dir
du echo exit get getfacl
geteas hardlink help history iosize
lcd link lock lowercase ls
l mask md mget mkdir
more mput newer notify open
posix posix_encrypt posix_open posix_mkdir posix_rmdir
posix_unlink posix_whoami print prompt put
pwd q queue quit readlink
rd recurse reget rename reput
rm rmdir showacls setea setmode
scopy stat symlink tar tarmode
timeout translate unlock volume vuid
wdel logon listconnect showconnect tcon
tdis tid utimes logoff ..
! |
Use the -L flag to get the list of shares on the Array. For example: | Code Block |
|---|
| language | bash |
|---|
| theme | Midnight |
|---|
| smbclient -L \\\\rdas.hpc.arizona.edu -U BLUECAT\\sohampal
Password for [BLUECAT\sohampal]:
Sharename Type Comment
--------- ---- -------
Q$ Disk Default root share for SRVSVC.
ipc$ IPC Named Pipes
upgrade Disk for qumulo upgrades
tmerritt Disk Desktop share for tmerritt created on 09/12/2023 12:24 PM
sarawillis Disk Desktop share for sarawillis created on 09/29/2023 10:14 AM
sohampal Disk Desktop share for sohampal created on 10/04/2023 10:12 AM
chrisreidy Disk Desktop share for chrisreidy created on 10/04/2023 11:08 AM
frios Disk Desktop share for frios created on 10/06/2023 11:17 AM
gondyleroy Disk Desktop share for gondyleroy created on 10/06/2023 12:04 PM
baylyd Disk Desktop share for baylyd created on 10/16/2023 10:57 AM
chopinsong Disk Desktop share for chopinsong created on 10/16/2023 04:57 PM
chader Disk Desktop share for chader created on 10/16/2023 04:58 PM
skibob Disk Desktop share for skibob created on 10/16/2023 05:01 PM
ejahn Disk Desktop share for ejahn created on 10/16/2023 05:08 PM
rychlik Disk Desktop share for rychlik created on 10/16/2023 05:10 PM
lofverstrom Disk Desktop share for lofverstrom created on 10/16/2023 05:21 PM
nirav Disk Desktop share for nirav created on 10/16/2023 05:25 PM
dkp Disk Desktop share for dkp created on 10/16/2023 06:17 PM
xiaosun Disk Desktop share for xiaosun created on 10/16/2023 07:33 PM
chanc Disk Desktop share for chanc created on 10/16/2023 08:19 PM
serena00 Disk Desktop share for serena00 created on 10/16/2023 10:26 PM
SMB1 disabled -- no workgroup available |
Any command that you can run interactively from the smb shell, you can also run non-interactively with the -c flag. For example to list the files and directories in your share, run: | Code Block |
|---|
| smbclient \\\\rdas.hpc.arizona.edu\\<share> -U BLUECAT\\<username> -c 'ls' |
You can also combine multiple commands with ";. For example to list the contents in a directory in your share, run: | Code Block |
|---|
| smbclient \\\\rdas.hpc.arizona.edu\\<share> -U BLUECAT\\<username> -c 'cd <directory>;ls' |
To copy a file from your local system to your R-DAS share use put, and from your R-DAS share to your local system use get: | Code Block |
|---|
| smbclient \\\\rdas.hpc.arizona.edu\\<share> -U BLUECAT\\<username> -c 'put <file>' |
To learn more about smbclient, run man smbclient. |
|
|
|
|